NOTE :
Push notification work on bases of device token so you need real IOS device to test notifications it can’t be tested on Stimulator.
Push notification is a message alert that is generated on user devices when publisher send any message or trigger any action. To seek user attention notification is used so that user can be alert about message and can take action on immediately.
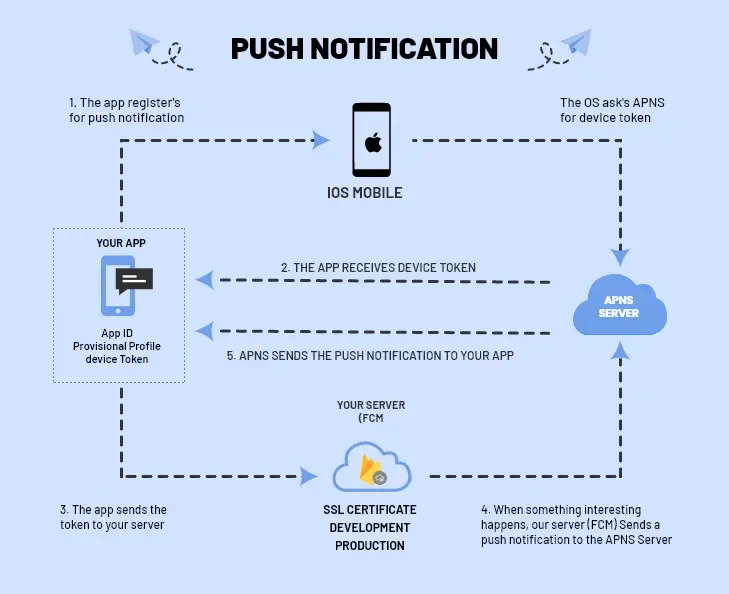
APNS LIFE CYCLE OR WORKING
- App register for push notification.
- OS asks APNS for the device token.
- App receive device token.
- App send token to server.
- Server sends notification to your device on token base.
Creates certificates for Push notifications
- Register app bundle identifier in apple developer account.
- Create SSL certificate for the same app Id.
- Create provisioning profile for push notification with adding devices for testing push notifications. openssl pkcs12 -in apns-dev-cert.p12 -out apns-dev-cert.pem -nodes -clcerts
- 5. You can test you pemp file from:-> https://github.com/noodlewerk/NWPusher
From Code
- Register for push notification.
- Handle token method i.e didRegisterForRemoteNotificationsWithDeviceToken .
- From Xcode target set: targets> Capability> background modes> Remote Notification
- Handle notification from didRecieveRemoteNotification method.
- Register Application for APNS
- Will call following delegate method to generate device token.
- On Receiving notification delegate method will be call:
- For permission request we use:
    let center = UNUserNotificationCenter.current()
    center.requestAuthorization(options:[.badge, .alert, .sound]) { (granted, error) in
    // If granted comes true you can enabled features based on authorization.
    guard granted else { return }
    application.registerForRemoteNotifications()
    }
    func application(application: UIApplication,didRegisterForRemoteNotificationsWithDeviceToken deviceToken: NSData) {  //send this device token to server}
    //Called if unable to register for APNS.
    func application(application: UIApplication, didFailToRegisterForRemoteNotificationsWithError error: NSError) { print(error)}
    func application(application: UIApplication, didReceiveRemoteNotification userInfo: [NSObject : AnyObject]) {
    println("Recived: \(userInfo)")
    //Parsing userinfo:
    var temp : NSDictionary = userInfo
    if let info = userInfo["aps"] as? Dictionary     {
    var alertMsg = info["alert"] as! String
    var alert: UIAlertView!
    alert = UIAlertView(title: "", message: alertMsg, delegate: nil, cancelButtonTitle: "OK")
    alert.show()
    }
    }
    UNUserNotificationCenter.current().getNotificationSettings(){ (setttings) in
    switch setttings.soundSetting{
    case .enabled:
    print("enabled sound")
    case .disabled:
    print("not allowed notifications")
    case .notSupported:
    print("something went wrong here")
    }
    }
Notification Payload Format:
    {
    "aps" : {
    "alert" : "It's a notification with custom payload!",
    "badge" : 1,
    "content-available" : 0
    },
    "data" :{
    "title" : "Game Request",
    "body" : "Bob wants to play poker",
    "action-loc-key" : "PLAY"
    },

    }

 Comments (5)


